Learn · Free guides for hobbyists
Learn to build circuits on perfboard
Seven practical guides that take you from "which board do I buy?" to a circuit that works: plain words, real numbers, and pictures of what good and bad look like.
The series
Read them in order for the whole journey, or jump to the one you need.
-
01 · BOARDS
Perfboard, stripboard or breadboard?
Breadboard, perfboard, stripboard or a breadboard-style protoboard? What each one is, what it's made of, and which to buy.
-
02 · LAYOUT
Plan a perfboard layout
From schematic to board: big parts first, power rails, decoupling, signal flow, tidy wiring, and the mirror-image trap.
-
03 · WIRING
Wire a perfboard
Bent leads, solder bridges, bus wire, jumpers, wire-wrap and enameled wire: when to use each, and which wire gauge.
-
04 · STRIPBOARD
Stripboard (Veroboard) layout
Think in strips: chips across cuts, rails and links, cutting tracks cleanly, and reading layouts the right way round.
-
05 · SOLDERING
Soldering tools and safety
The iron, tips, solder and flux worth buying, what temperature to set, tip care, and how to stay safe.
-
06 · SOLDERING
How to solder (and fix bad joints)
The five-step joint, what good looks like, a gallery of bad joints with their fixes, and how to desolder.
-
07 · TESTING
Test and debug your board
Look, beep, measure, then power up gently: a safe first power-up, and what to check when it doesn't work.
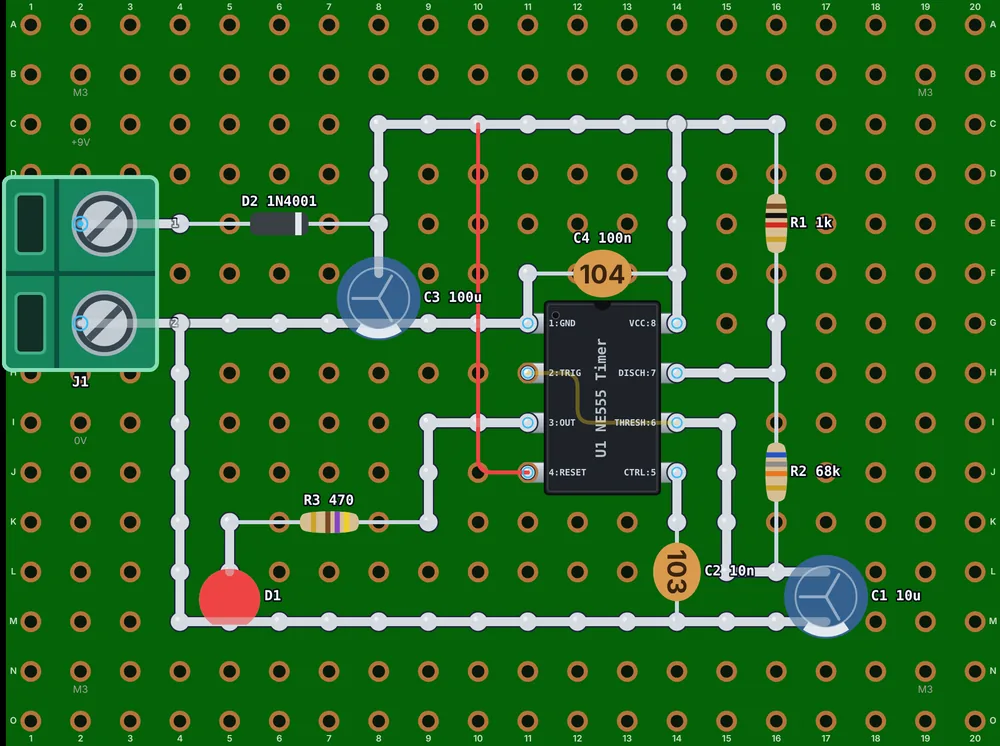
Build along: a 555 LED blinker
The guides follow one small project all the way: a 555 timer flashing an LED about once a second from a 9 V battery. Build it as you read, and by the end you'll have used every technique in the series.
What you need
- U1 NE555 timer, and an 8-pin DIP socket
- R1, R2, R3 ¼ W resistors: 1 kΩ, 68 kΩ and 470 Ω
- C1, C3 electrolytic capacitors, 16 V or more: 10 µF and 100 µF
- C2, C4 ceramic capacitors: 10 nF and 100 nF
- D1 a red LED, and D2 a 1N4001 diode
- J1 a 2-way screw terminal (5.08 mm), or a 2-pin header (2.54 mm) for the stripboard version, and a 9 V battery clip
- Perfboard of at least 20 × 15 holes: a 5 × 7 cm board has room
- Bare tinned wire, and a little red and yellow solid-core wire
- Optional: four M3 screws and standoffs
Handy extras
-
REFERENCE
Glossary
Every word in the guides, from AWG to wetting, in a sentence or two, with a link to where it's explained.
-
PRINTABLE
Bench card
The temperatures, the five-step joint, quick fixes and the first power-up, on one page to keep next to the iron.
Numbers worth remembering
Plan it before you solder it
Perfboard Designer is a free layout tool for perfboard and stripboard that runs in your browser: place parts, wire them, check every connection, flip to the solder side and print it at true size.